


This article will give you the details of the best practices of yoga to help manage diabetes that you can introduce into your lifestyle for managing the symptoms better.
The lifestyle conduct greatly determines diabetes management, especially for type-2 diabetes. It depends on the kind of food you eat. Not only the food that you eat but also the level of activity you include in your daily routine determines diabetes management.
By inculcating active lifestyle habits and by integrating exercise routines in your life, your diabetes can be managed. One can practice different types of daily activities and exercises
Yoga is one of those physical activities that play a pivotal role in maintaining health in every diabetic patient, irrespective of their age or current state of health. Not just physically, but yoga supports mental well-being as well, enabling you to lead a more mindful life.
Why is Yoga Beneficial for Diabetes Patients?
Type-2 diabetes is primarily a lifestyle disorder, one that gets worse with the increase of insulin resistance in the body.
If you are diagnosed with diabetes, be assured that your doctor’s first aim is to reduce or prevent the impacts of insulin resistance in the body. Indulging in physical activities like yoga and exercising improves the body’s insulin sensitivity, thereby improving the cell’s efficacy to metabolize blood glucose into energy.
Hence, yoga asanas for diabetes management aren’t folklore but a scientifically proven fact that can help you get into remission and better manage the symptoms.
What Are the Best Yoga Asanas for Diabetes?
No wthat we have a basic understanding of yoga’s importance in the management of diabetes. let us now discuss the list of the best yoga asanas that you can integrate into your daily lifestyle to get the most benefit.
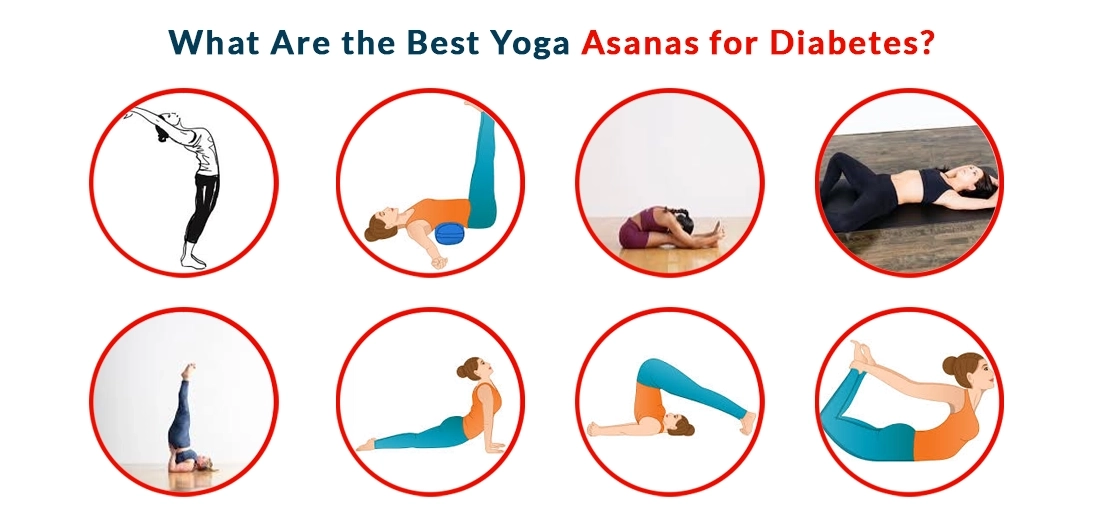
1. Sun Salutations (Surya Namaskar)
- Targets – Open chest muscles, hamstrings, and shoulders.
- Benefits – Improve blood circulation, blood sugar levels, and insulin sensitivity in your body.
How to do it?
- You need to Stand straight (with your back straight) at your yoga mat. Keep your stomach firm and taut, and in place. Do this while you inhale deeply and join your palms.
- Now, gradually raise your hands above and stretch your hands at your backside.
- Step one leg forward as you exhale. Lengthen your spine and look down while relaxing your neck in the process.
- As you inhale again, place your extended leg back so as to ensure that your right knee touches the ground.
- Meanwhile, your other knee should be kept at a 90-degree angle. While your palms are laying on the ground flat.
- Hold your breath for a few seconds while you keep your gaze straight ahead.
- Then reach to a plant position on the ground by taking your left leg back gently.
- Now lower you body slowly down so that your chin, chest and knees touch the ground, ss you exhale slowly.
- Life your body along with lifting your gaze upwards to the ceiling ss you inhale slowly.
- Lift yourself back up as yo exhale your breath. And slowly get yourself aligned into the inverted-V pose.
- Now slowly move your right leg forward. Keep your breath rhythm - steady.
- Exhale deeply while you bring your leg (Left leg) in the front.
- Then touch your toes by slowly bending down and then touch. Then try to place your palms on the ground flat.
- Then again raise your arms up and stretch your back as well. Meanwhile, join your palms and stretch them on the top of your head as you inhale again.
- Repeat this entire asana process at least 5-10 times.
2. Legs-Up-the-Wall Pose
- Targets – Pelvic muscles, Hamstrings, Front torso, Lower back.
- Benefits – Relaxes the body muscles and decreases the stress levels in your body. It helps regulate and manage your blood glucose levels and blood pressure also.
How to do it?
- Place a yoga mat or towel against the floor.
- Now lay down on the mat.
- Ensure that your right side of the body is placed against the wall.
- Slowly raise your legs upwards along with the wall. Keep swinging your legs to make a 90-degree angle with the wall.
- Place your hands and arms on both the side of your body. Ensure that your palms face upwards.
- While you keep swinging your legs, ensure to breathe out with every movement and make sure that you relax your chin, throat, and neck as you breathe in and out.
- Keep the swinging of your legs continued against the wall for at least 5 minutes.
- Once done, slowly bring down your legs on the mat back.
3. Seat Forward Bend
- Targets – Erector spinae, Pelvic muscles, Gastrocnemius
- Benefits – Supports weight loss, lowers blood pressure, and relieves your anxiety and muscle stiffness.
How to do it?
- Lay your yoga mat on the ground and sit on the yoga mat. Keep your legs wide in front of you.
- If you experience knee pain while performing you can keep some support under your knees.
- While you keep your hips hinged, bend your arms and bring from the hips to touch down your toes.
- Now bend yourself enough so to make your torso bend into the legs.
- Stay in this position for approximately 1-3 minutes.
- Don’t overexert yourself. Only stretch and fold your upper body without hurting yourself.
4. Reclining Bound Angle Pose
- Targets – Pelvic muscles, groin muscles, adductors
- Benefits – Calm your nervous system, keep your blood pressure regulated and your blood sugar levels in good level.
How to do it?
- Spread your yoga mat flat on the ground. Sit on your mat.
- This asana is among the best restorative yoga asanas that helps regulate diabetes.
- Once you are seated, you should bring your feet soles closer to each other so that they are touching. Do this while your knees are outwardly bent.
- Lean back gradually until your back reaches/touches the yoga mat surface. If you cannot bend enough to find good support, ask someone else to assist you.
- Relax while performing and keep breathing deeply. Also, try to keep your palms on each side of your body while your palms are facing upwards.
- Relax your hips and press down on the thighs. This will exert stretch on to your muscles.
- Try to hold this position in for around 5-10 minutes.
- Gradually separate your soles and relax your legs as you return to your initial position.
5. Supported Shoulder Stand
- Targets – Rotator cuff, rectus abdominis, quadriceps
- Benefits – Improves your blood circulation, stimulates your thyroid function, relieves the stress, and improves your insulin sensitivity.
How to do it?
- This yoga asana is great for sugar patients. Although this position is quite advanced. If you can not perform it alone, take help from someone else.
- Start the exercise by laying your yoga mat on the floor and lying on it. Some folded towels under your shoulder can provide cushioning and support to you.
- Keep your palms on both the sides of your body while you are keeping your palms to face down.
- Gradually try to lift your both legs up in the air and then gradually bring them towards your head.
- Hold out your palms under your hips to take some support.
- To achieve the correct asana, lift your legs enough in order to make your hip, shoulder, and spine in proper alignment.
- Try to hold this pose approximately for 30 seconds.
- And then bring back your legs down into the initial position.
6. Upward-Facing Dog
- Targets – Triceps brachii, gluteus maximus, hamstrings, quadriceps, etc.
- Benefits – Lowers your blood pressure, regulates your blood glucose levels, supports in weight loss, and stimulates your abdominal organs.
How to do it?
- Place your yoga mat and lie on it on your stomach.
- Keep straight your body in a line while you are placing your palms flat.
- Keep your forearms at an angle of 90-degree against the floor.
- Put a little pressure on your palms and straighten them to lift your upper body from the floor.
- Try to hold this lifted position and look front straight.
- Keep your neck and throat relaxed as you keep your shoulders and buttocks taut.
- Try to hold this position in for around 20-30 seconds and then gradually lower yourself back in the initial position.
7. Plow Pose
- Targets – Spinal extensors, Hamstrings, rotator cuff
- Benefits – Improves your blood circulation, stimulates your thyroid function, regulates your levels of blood glucose, reduces the stress, relieves any headache, and improves insomnia symptoms.
How to do it?
- Lay your yoga mat on the floor. This type of yoga asana is good for type 1 diabetes (and type 2 as well).
- Do a shoulder stand first while you gradually move your feet above your head.
- Move your hands towards your hips and take support.
- Try staying in this position for approximately 1 minute.
- Once you are done, roll your spine and bring your legs back down gradually to the original position.
8. Bow Pose
- Targets – Quadriceps, hamstrings, pectoralis major
- Benefits – Stimulates your abdominal organs, improves your blood glucose levels, relieves any pulmonary complications, and relieves you from constipation.
How to do it?
- Lay your yoga mat and lie down on it on your stomach while you are keeping your palms on both the side of your body, facing up.
- Gradually bend your knees and move your hands. Hold your ankles on to the outside.
- Gradually try to lift your chest, head, and knees while you are looking forward.
- Try to practice a deep breathing exercise during the process.
- Try to hold this position for approximately 30 seconds.
- Release the pose slowly as you exhale.
9. Child’s Pose
- Targets – Spinal extensors, gluteus maximus, hamstrings, rotator muscles.
- Benefits – Promotes your muscle relaxation, relieves any neck pain, and sensitizes your beta cells’ function present in the pancreas.
How to do it?
- Lay your yoga mat and lie on it. Get on your knees and ensure that you have placed your knees in a hip-width apart distance.
- Move yourself back a little so that your buttocks touch your heels.
- If you experience any discomfort or knee pain or discomfort, take support form a cushion.
- Try to bend slightly your upper body and then touch your forehead on the floor by leaning forward.
- Bring in front your arms and then extend them to slightly stretch around your armpits and shoulders.
- As you keep breathing, try to stay in the same position for around 5 minutes.
- Lastly, lift yourself up while you exhale slowly.
10. Corpse Pose (Shav Aasana)
- Targets – Back muscles
- Benefits – Lowers your blood pressure, regulates your blood glucose, relieves any fatigue and insomnia.
How to do it?
- When try to get relieved of the type-2 diabetes, try to include the corpse pose in order to complete your yoga routine.
- Lay your yoga mat and lie down flat on your back on it.
- Spread out your legs a little wider than your hip-width.
- Rest your arms on both the sides of your body while your palms face up.
- Maintain this straight positioning. It forms a “Y” shape.
- Press your body on the floor as you feel tension relieving from your body.
- Try to stay in this position for approximately 10-20 minutes.
Conclusion
Diabetes is a diseases that progresses. Diabetes is a global concern that has affected more than 400 million people globally. If you get diagnosed with this condition, it is the right time to focus on your alternative therapies including yoga. This will help you to manage and regulate your levels of blood in your body.
FAQs
Should I do yoga every day for diabetes?
You can do yoga everyday, infact inculcating yoga in your every day routine can prove to be extremely useful for maintaining your diabetes. You should ensure that your yoga asana poses are correct so that they will optimize and support your overall health, instead of making things worse for you.
Can I do yoga with knee pain?
Avoid doing yuga poses If you have knee pain. Especially those that put pressure on your knees. This might enhance your ailment.
Do I need a trainer for doing yoga for diabetes?
You can start your yoga journey with a trainer if you are entirely new to this yoga routine. You can get trainer assistance if you do not have any idea about different yoga poses.


